Thursday, September 11, 2014

Getting started To Create WEB - Lesson 01

HTML & CSS

 HTML, HyperText Markup Language, gives content structure and meaning by defining that content  as, for example  headings, paragraphs, or images. CSS, or Cascading Style Sheets, is a presentation language created to style the appearance of content using, for example, fonts or colors.

Understanding Common HTML Terms

Elements

Elements are designators that define the structure and content of objects within a page. Some of the more frequently used elements include multiple levels of headings (identified as <h1> through <h6> elements) and paragraphs (identified as the <p> element). The list goes on to include the <a>, <div>, <span>, <strong>, and <em> elements, and many more.

Elements are identified by the use of less-than and greater-than angle brackets, < >, surrounding the element name. Thus, an element will look like the following.


 Tags

The use of less-than and greater-than angle brackets surrounding an element creates what is known as a tag. Tags most commonly occur in pairs of opening and closing tags.

 Attributes

 Attributes are properties used to provide additional information about an element.


 HTML syntax outline including an element, attribute, and tag

 HTML Syntax Outline

 Setting Up the HTML Document Structure

  • All HTML documents have a required structure that includes the following declaration and elements: <!DOCTYPE html>, <html>, <head>, and <body>.
  • The document type declaration, or <!DOCTYPE html>, informs web browsers which version of HTML is being used and is placed at the very beginning of the HTML document.
  • After the document type declaration, the <html> element signifies the beginning of the document.
  • Insides the <html> element, the <head> element identifies the top of the document, including any metadata (accompanying information about the page). 
  • All of the visible content within the web page will fall within the <body> element.


Self-Closing Elements


In the previous example, the <meta> element had only one tag and didn’t include a closing tag. Fear not, this was intentional. Not all elements consist of opening and closing tags. Some elements simply receive their content or behavior from attributes within a single tag. The <meta> element is one of these elements. The content of the previous <meta> element is assigned with the use of the char set attribute and value. Other common self closing elements include

  • <br>
  • <embed>
  • <hr>
  • <img>
  • <input>
  • <link>
  • <meta>
  • <param>
  • <source>
 ----------------------------------------------------------------------------------------------------------------------------
  

Understanding Common CSS Terms

 Selectors

As elements are added to a web page, they may be styled using CSS. A selector designates exactly which element or elements within our HTML to target and apply styles (such as color, size, and position) to.


 Properties

Once an element is selected a property determines the styles that will be applied to that element. Property names fall after a selector within the curly brackets {} and immediately preceding a colon, :. There are numerous properties we can use such as background, color, font-size, height and width and new properties are often added. In the following code. We are defining the color and font-size properties to be applied to all <p> elements.


Values


 CSS syntax outline including a selector, properties, and values

CSS Syntax Outline


Working with Selectors

Type Selectors

 Type selectors target elements by their element type.


Class Selectors

 Class selectors allow us to select an element based on the element’s class attribute value. Class selectors are a little more specific than type selectors, as they select a particular group of elements rather than all elements of one type.

Class selectors allow us to apply the same styles to different elements at once by using the same class attribute value across multiple elements.


ID Selectors

ID selectors are even more precise than class selectors as they target only one unique element at a time. Just as class selectors use an element’s class attribute value as the selector ID selectors use an element’s id attribute value as a selector.

Regardless of which type of element they appear on id attribute values can only be used once per page. If used they should be reserved for significant elements.

Within CSS, ID selectors are denoted by a leading hash sign # followed by the id attribute value. Here the ID selector will only select the element containing the id attribute value of shayhowe.


 ----------------------------------------------------------------------------------------------------------------------------

Referencing CSS

 In order to get our CSS talking to our HTML we need to reference our CSS file within our HTML. The best practice for referencing our CSS is to include all of our styles in a single external style sheet which is referenced from within the <head> element of our HTML document.


Within the <head> element of the HTML document the <link> element is used to define the relationship between the HTML file and the CSS file. Because we are linking to CSS, we use the rel attribute with a value of stylesheet to specify their relationship. Furthermore, the href hyperlink reference) attribute is used to identify the location, or path, of the CSS file.


Reset auto increment in Sql Server tables after delete records (Without truncate table)

In this post i'll describe how to reset auto increment in sql server tables  after delete records.

During application development, we often input dummy data into our database for testing purposes. But then we come to the point where we want all records of the table to be deleted and also want to start the identity column values from 0. For this, we delete existing data using following command.

DBCC CHECKIDENT('[table_name]', RESEED, [new_reseed_value])
-- for example
DBCC CHECKIDENT('product', RESEED, 0)
if we entered [new_reseed_value] as 0 then in the next insert the auto increment field will contain value 1
if we entered [new_reseed_value] as 100 then in the next insert the auto increment field will contain value 101

Working with SQLite in Windows Phone 8: a sqlite-net version for mobile


With a perfect timing, as soon as I’ve published my previous post about using thechsarp-sqlite engine in combination with sqlite-net, Peter Huene has released a porting of the famous library for Windows Phone 8. What does it mean? That, finally, we are able to use the native SQLite engine that has been released as a Visual Studio extension and that we can use a common library to share our data layer with a Windows Store app for Windows 8.
At the moment, the project isn’t available on NuGet yet and requires two steps: the first one is to add a native class, that acts as a wrapper for the functions used by sqlite-net, and the second is to download a specific sqlite-net version, where the developer has replaced the usage of the csharp-sqlite engine with the native one.
Let’s start!

Please welcome GitHub

Both projects are hosted on GitHub (a popular website to host open source projects that also acts as a source control system based on Git), so the best way to download and use both them is using Git: you can also download the project in a single zip file but, this way, every time the developer will change something you’ll have to download everything again and add the new project to your solution. If you’re not familiar with Git, the easiest way to use it is to download GitHub for Windows, which is a Windows client that is able to connect to repositories hosted on GitHub and to keep files in sync with the server.
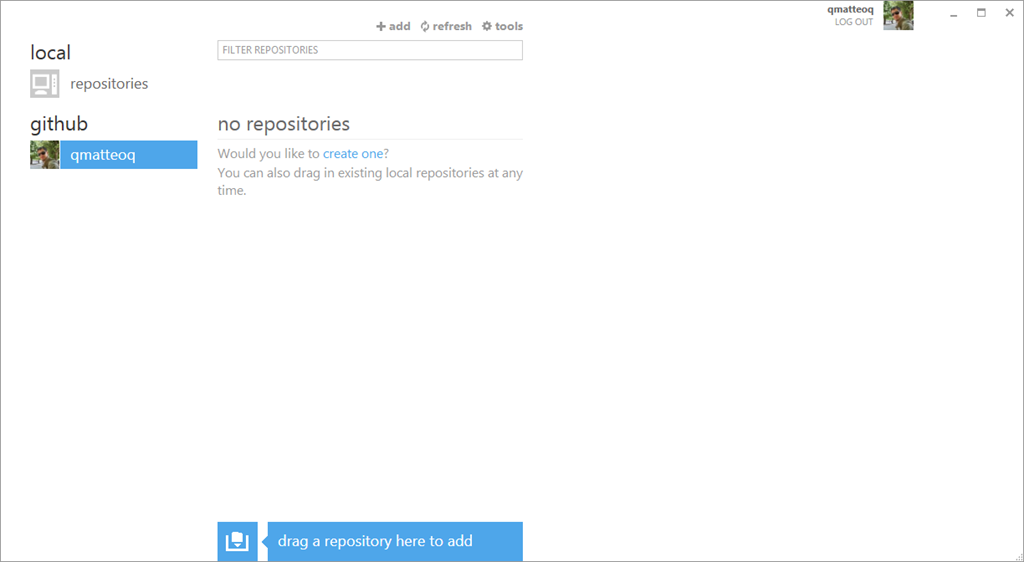
Just download and install the application from here: after you’ve launched it you’ll have to configure it for the first time. You’ll need to have a valid GitHub account: if you don’t have it, simply go to the website and create one. Once you’ve done you should see a window like this:
image
Unless you’ve already used GitHub and you already own one or more repositories, the window will be empty. Now go to the GitHub website and, specifically, to thesqlite-net-wp8 repository, that is available at the URLhttps://github.com/peterhuene/sqlite-net-wp8. At the top of the page, in the toolbar, you’ll find a button labeled Clone in Windows. Click on it and make sure that you’ve logged in in the website with the same credentials you used for the application, otherwise you’ll be redirected to the page to download the GitHub client.
image
Once you’ve done it the GitHub client will be opened and the repository will be automatically added to the local repositories list: after a while (the progress bar will show you the status of the operation) the whole repository will be downloaded in the default location, that is the folder C:\Users\User\Documents\GitHub\ (where User is your Windows username). Inside it you’ll find a folder called sqlite-net-wp8: that is the project that we need to add to our solution.
Since we’re already playing with GitHub, let’s download also the sqlite-net fork adapted to work with Windows Phone 8: repeat the operations we’ve just made on the repository available at the URL https://github.com/peterhuene/sqlite-net.
The last thing to do is to make sure you’ve installed the SQLite for Windows Phoneextension, that is available from the Visual Studio Gallery.
Now that we have everything we need, we can start working on our Windows Phone 8 project.

Let’s play with SQLite

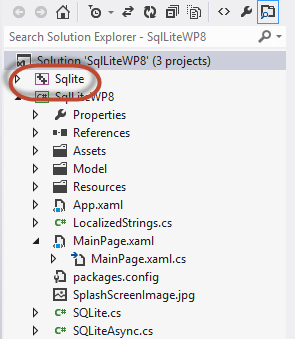
The first thing to do is to open Visual Studio 2012 and to create a Windows Phone 8application. Once you have it, it’s time to add to the solution the sqlite-net-wp8project we’ve downloaded from GitHub: simply right click on the solution, chooseAdd existing project and look for the file Sqlite.vcxproj in the sqlite-net-wp8 folder (that should be C:\Users\User\Documents\GitHub\sqlite-net-wp8). You’ll see the new project added in the Solution Explorer: it will have a different icon than the Windows Phone project, since it’s written in native code and not in C#.
image
As I’ve previously explained, this is just the native wrapper for some of the functions used by sqlite-net: now we need to add the real sqlite-net and we do that by simply copying the Sqlite.cs and SqliteAsync.cs files that are stored inside the src folder of the solution (that will be available, as for the other one, in theC:\Usesr\User\Documents\GitHub folder) into our project. We can do that by simply right clicking on the Windows Phone project and choosing Add existing item.
Now we need to add a reference in our Windows Phone application both to thesqlite-net-wp8 library and to the SQLite engine: right click on your project, chooseAdd reference and, in the Solution tab, look for the sqlite library; after that, look for the SQLite for Windows Phone library, that is available in the Windows Phone –Extensions section.
UPDATE: the developer, to keep supporting also the C# engine I’ve talked about in my previous post, has recently added a new requirement to use his library; you’ll have to add a specific contitional build symbol, in order to properly use the native engine. To do that, right click on your project (the one that contains the Sqlite.csand SqliteAsync.cs files you’ve previously added), choose Properties, click on theBuild tab and, in the Conditional compilation symbols textbox add at the end the following symbol: USE_WP8_NATIVE_SQLITE. In a standard Windows Phone 8 project, you should have something like this:
SILVERLIGHT;WINDOWS_PHONE;USE_WP8_NATIVE_SQLITE
And now? Now we can simply copy and paste the code we’ve already seen in theoriginal post about Windows 8 or in the more recent post about csharp-sqlite: since all these libraries are based on sqlite-net, the code needed to interact with the database and to create or read data will be exactly the same. Here are the usual examples I make about doing common operations:
UPDATE: as some readers have pointed out in the comments, with the previous code eveyrthing was working fine, but the database file was missing in the local storage. As the sqlite-net-wp8 developer pointed me out, there’s a difference between the Windows 8 and the Windows Phone version of the library. In Windows 8 you don’t have to set the path, it’s automatically created in the root of the local storage, unless you specify differently. In Windows Phone 8, instead, you have to pass the full path of the local storage where you want to create the databse: the code below has been updated to reflect this change.
//create the database
private async void CreateDatabase()
{
    SQLiteAsyncConnection conn = new SQLiteAsyncConnection(Path.Combine(ApplicationData.Current.LocalFolder.Path, "people.db"), true);
    await conn.CreateTableAsync<Person>();
}
//insert some data
private async void Button_Click_1(object sender, RoutedEventArgs e)
{
    SQLiteAsyncConnection conn = new SQLiteAsyncConnection(Path.Combine(ApplicationData.Current.LocalFolder.Path, "people.db"), true);
    Person person = new Person
    {
        Name = "Matteo",
        Surname = "Pagani"
    };
    await conn.InsertAsync(person);
}
//read the data
private async void Button_Click_2(object sender, RoutedEventArgs e)
{
    SQLiteAsyncConnection conn = new SQLiteAsyncConnection(Path.Combine(ApplicationData.Current.LocalFolder.Path, "people.db"), true);
    var query = conn.Table<Person>().Where(x => x.Name == "Matteo");
    var result = await query.ToListAsync();
    foreach (var item in result)
    {
        Debug.WriteLine(string.Format("{0}: {1} {2}", item.Id, item.Name, item.Surname));
    }
}

Be careful!

There are some things to keep in mind when you work with this library and SQLite. The first one is that, actually, both libraries are not available on NuGet: you’ll have to keep them updated by using GitHub for Windows and, from time to time, by syncing the repositories, in order to have your local copy updated with the changes. If you’re going to add the sqlite-net-wp8 project to the solution, like I did in the post, you won’t have to do anything, you’ll just have to rebuild your project. In case of thesqlite-net fork, instead, since we’ve simply copied the files, you’ll need to overwrite the old ones with new ones, in case they are updated. Or, even better, you can add the two files as a link from the original project: this way you’ll simply have to update the libraries from GitHub to see the updates in your application.
The second important thing to consider is that the sqlite-net-wp8 library is built against a specific SQLite version: if the SQLite team releases an update to the Visual Studio extension (so that Visual Studio is going to prompt you that there’s an update to install), don’t update it until the sqlite-net-wp8 project has been updated. Otherwise, many references will be missing and you won’t be able to open the project at all.